

|
|
||||||||||||||||
|
|
|
|
 |
|
|
Here is the Rigs and Tips page 2, which is aims to be as clear and simple as possible. There are both visual and written step by steps of how to make these rigs as well as details of what you can expect to catch by using and where each rig can be best utilised.
To make most of the rigs on this page you will need:
· Crimps · Hooks in a variety of sizes depending on the target species · Beads, coloured and clear if possible · Gemini genie clips · Swivels, some small and some medium to large · Bait clips to hold the hooks to the rig body, Breakaway impact shields and possible cascade swivels. · Main rig body line of approx 60lb (average) but can be stronger or weaker depending on conditions. · Snood line of anything between 10-25lb depending on target species and location i.e. if fishing for mullet you may want 8lb line but if youre fishing rough snaggy ground for other species you may want 25lb. I would personally recommend using clear line as the bait appears more natural in the water and is less likely to spook fish, however, some fish such as whiting are supposedly attracted to coloured line. If you are unsure about any of the terms or the tackle used on this page then please click here for a full guide and glossary.
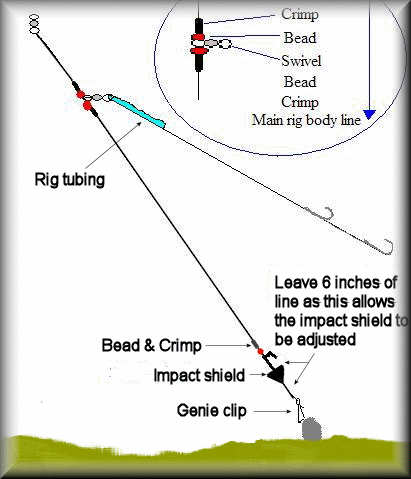
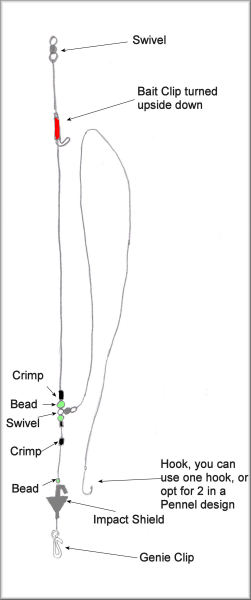
The Clipped down paternoster rig (Plus Pennel explanation): The Pennel method of fishing is associated with how the hooks are presented. As you can see in the picture below, the pennel design is to have 2 hooks on one snood and is a great method for targeting larger specimens with bigger bait ups. This is because larger species have bigger mouths and will sometimes hit the top of yor large bait instead of the bottom and by having 2 hooks you increase your chance of a hook up. There are multiple ways in which you can set a pennel up and it really comes down to personal preference. Click here or visit the video/downloads page to see a video guide to building this rig.
I should clarify that althoug the picture below is used to demonstrate how a pennel set up can be used, the pennel aspect relates soley to how the hooks are presented and that this method can be used with a variety of rigs including the clipped down paternoster (below), Pulley rig (popular over rough ground), running ledger etc.
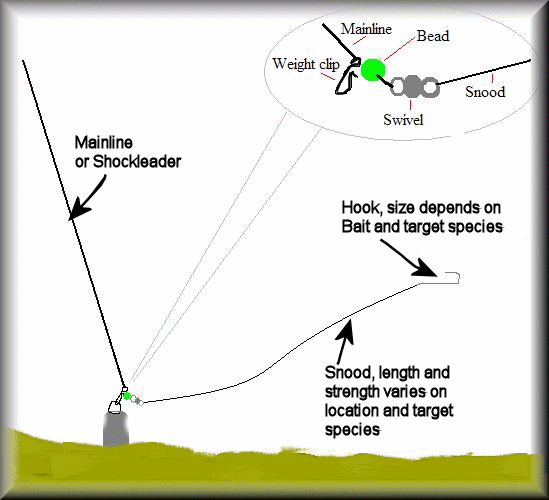
The running ledger rig: This is a highly versatile rig that can be used to target a wide range of species and be used with a range of baits such as worm, live bait, mackerel fillet. You can target a range of fish. For example you can use this rig with a size 1/0 or bigger hook with a live bait on such as Joey Mackerel or whiting for Bass or Cod. Instead you could try it with a size 2 hook and lots of beads and sequins for flounders and plaice or 10lb line and size 6 hooks with a bunch of red rag (harbour rag) for mullet from the beach. On thing is important and that is to set your drag or hold on to your rod if your after a big fish otherwise you may lose it. If you use it with a live bait it will allow the fish to move around and giving off vibrations of a distrest fish whereas if you use worm of a static bait it will lay on the bottom and flow in the tide. The picture below demonstrates how it would flow with a live bait on. Hook the live bait through the top lip. Another positive about the rig is that bite indication is very good because the hook length is in direct link with the mainline. The only limitation of it is that generally its use with one hook. Although you can add more hooks along the snood which can be deadly for flatfish.
The design is simple and this is why it is so versatile. once you have threaded your mainline through all your rods eyes make sure you pull an extra few yards off the spool to allow you some movement. Thread a weight cilp up the mainline, this can be a genie clip or an american snap swivel. After this thread a bead up the line and tie the loose end to a swivel. After that tie your desired hook length and line strength to the other end of the swivel and then tie your chosen hook size to the other end of the line. You can add beads, sequins and spoons etc befoe you tie on the hook depending on what fish you are after.
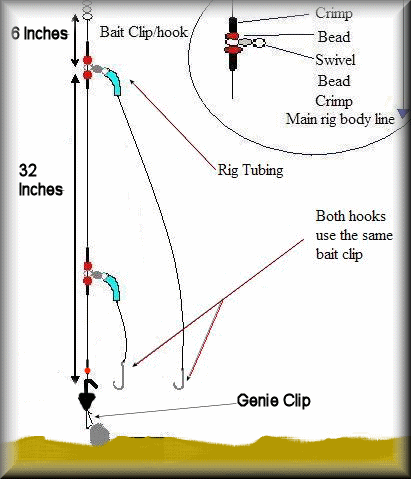
The Bomber Rig: This rig is an effective long distance rig that is quite underrated. It allows both hooks to be clipped down under the same bait clip/impact shield. This means that the rig will be more aero dynamic and should allow you to get an extra few yards which can be highly important in winter months. Both hooks will come free of the bait clip on impact with the sea. Another benefit is that due to the difference in the hook lengths it allows one to be more static and pinned to the bottom while the other is more flowing in the tide so that a range of tactics are being used. You will need: · 4 x Crimps · 4 x Beads (more if putting them on hook length) · 2 x Hooks (size is your choice, size 2 is a good all round size) · 3 x Swivels · 2 x Pieces of Rig Tubing · 1 x Bait clip or Impact shield · 1 x Gemini genie clip · Fishing line for rig body 50-80lb · Fishing line for snoods 12-35lb
Long range, long flowing rig: This rig is designed to get a long flowing snood out a long way. If you cast an unclipped rig like this you would achieve a lot less distance due to the drag and resistence of the snood flapping about in the air. By having it clipped down in a streamline way it allows you to achieve much greater distance but to still have a long flowing snood which can be important for catching many species. You can adjust the rig by changing the hook size or using is with a pennel hook type set up. You may wish to add beads and/or a spoon if fishing for Plaice.
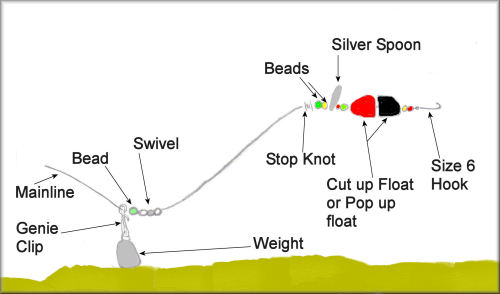
A special Mullet Rig: This rig may seem crazy when linked in the same sentence with Mullet who are renound for being easily spooked but I assure you that it really does work. I have used it many times when fishing the river ouse and founds it to be most successful on the stretch just down from the bedingham round about. You set it up like a running ledger and only have a short snood of a maximum 20 inches. The Mullet are attracted to the colours and the flashing of the silver spoon and take the bunch or redrag or other ragworms you have on the end. You can now but the little pop up float from most tackle shops. They were mainly designed to get the bait away from the crabs but have become an effective mullet tool. I made my rig by chopping off 2 ends of a float and using them. I prefer this as it worked for me on my first cast resulting in 3lb mullet and i continued to catch them throughout the day. i ended up with more fish then my dad and his friend who were using the shop bought float. please not that even if you by the shop pop up floats you will still need to make the rest of the rig up using beads etc.
Pulley Rig: The pully rig is a great rig for casting along snood far as it is streamline to the mainline. You can also fish it close in for Bass. It allows you to fish a long snood of up to 6ft without the hassle of tangled line. Your choice of hook and technique depend upon the species you are targeting. For instance if your after Plaice you could add lots of beads and a spoon to attract them in the flowing tide or if your after Bass you could use a Pennel rig with your chosen bait attatched. CASTING HINTS AND ADVICE: For great advice on how to use different casting styles please visit the link below, it offers step by steps and video guides on techniques such as off the ground and pendulum casts. (As the site is external i take no responsibility of its content) Casting advice: http://breakawayusa.com/howto.htm or http://www.safetylighting.co.uk/kk2/casting_clinic_interface/Results/results_page.asp IF YOU HAVE ANY QUESTIONS PLEASE EMAIL: craigide@sussexseafishing.co.uk OR LEAVE A MESSAGE VIA THE GUESTBOOK AND CLICK PRIVATE
Copyright © 2006 SussexSeaFishing |
||
|
|
||
Copyright © 2006 SussexSeaFishing
craigide@hotmail.co.uk
#sussexseafishin
| Site Map |