

|
|
||||||||||||||||
|
|
|
|
 |
|
|
Here is the Rigs and Tips page 1, which is aims to be as clear and simple as possible. There are both visual and written step by steps of how to make these rigs as well as details of what you can expect to catch by using and where each rig can be best utilised.
To make most of the rigs on this page you will need: · Crimps · Hooks in a variety of sizes depending on the target species · Beads, coloured and clear if possible · Gemini genie clips · Swivels, some small and some medium to large plus some cascade swivels for the clipped down rigs. · Breakaway impact shields. · Main rig body line of approx 60lb (average) but can be stronger or weaker depending on conditions. · Snood line of anything between 10-25lb depending on target species and location i.e. if fishing for mullet you may want 8lb line but if youre fishing rough snaggy ground for other species you may want 25lb. I would personally recommend using clear line as the bait appears more natural in the water and is less likely to spook fish, however, some fish such as whiting are supposedly attracted to coloured line. If you dont understand any of the terms then click here to view the tackle guide which also includes a glossary of terms such as snoods, rig body etc.
Important - The Impact Shield and base of the Rig. First things first, one of the most important parts of a clipped down rig is the base, get this wrong and it can effect the wole rig. This is a quick guide of how to use the breakaway impact shield to best effect, once you understand this, it will help you make most of the clipped down rigs on the site. At the bottom of most of the clipped down rigs you will see this image (although smaller and connected to a rig). This is a zoomed in image just to show how it works. At the bottom of the rig you want a few inches (3-6) between the genie clip or link and the crimp. This simple part of the rig allows you adjust the bottom section of the clipped down rig by sliding the impact shield up and down, ensuring that it is always tight. If you did not do this and placed only an inche between these sections it would give you little room to adjust the rig. It allows you much greater flexibility when making the rig or changing it when you loose a hook or your snood is damaged as you can quicky re-tie another one without having to worry about it being milimetre perfect as this method allows you a few inches to make mistakes. I have also included a key which should help you to identify some of the tackle in the pictures below. Check out the video/downloads page for a video guide of how to set this up and explanation of its uses.
Step by Step:
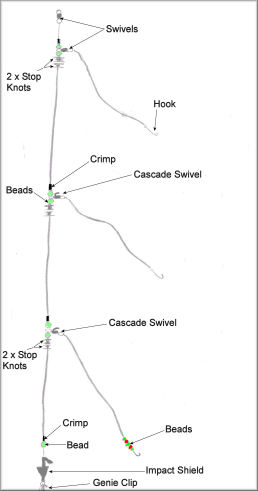
The 2 Hook Paternoster (clipped down optional): This is probably one of the most versatile all year round rigs used by sea anglers. It is simple to make and there are multiple variances. Its your choice whether you use a clipped down verion or not. The main beneft of having a clipped down rig is that it will keep your bait more streamline in the air so that you can cast further, which in winter can be the difference in catching or not. It also keeps the bait presented better as it is protected while castingb and upon impact with the sea. This version of the rig will unclip on 99% of casts and is the best design of clipped down rig i have used. You can use the hooks in the way shown above or you can use a a slight alternative design called a one up one down where the bottom snood is nearer the weight. This allows the bait to be closer to the sea bed which can be beneficial when targeting certain species.
Unclipped version: The image above displays the clipped down version of the rig. If you want to make the rig without it being clipped down then you need to make 2 minor adjustments, firstly replace the cascade swivel with a normal swivel and secondly dont use the impact shield at the bottom as its not needed. Also you can use standard crimps instead of the stop knots when making an unclipped rig as these are used on the clipped down rigs so that you can adjust the rig to make sure that it is clipped down tightly for each cast, it seriously makes it easier to make the rig and adjust it or tie new snoods when fishing. Measurements: The rig dimensions are up to you as they can often be determined by the sea state, type of ground you are fishing and casting style. The measurements given below are purely guidlines but you can adjust these to suit your needs. The Rig body should be about 46 inches from top to bottom. The top snood should be about 20 inches long and the bottom snood should be approx 18 inches. There should be around 4 inches spare at the bottom so that you can use the impact shield and adjust it. There should also be about 4 inches between the top swivel and the first snood section. A few important tips when making the rig: Instead of using a crimp under the beads and swivels you will see that I have advised using 2 stop knots, this is so that you can adjust the rig and snood length to make sure that it is clipped down tightly for each cast, it seriously makes it easier to make the rig and adjust it or tie new snoods when fishing. When fitting the Impact shield at the bottom leave a few inches between the genie clip at the bottom and fixing the crimp, this allows the breakaway shield to be adjusted and again makes using and making the rig much more easier. The reason I advise using 2 stop knots is for added protection and assurance that if one comes loose you still have the second to back it up. They can be tied with low diameter line or power gum. The cascade swivel allows the upper snood to be clipped down to the rig tightly. This way of making the clipped down rig ensures that it will unclip on impact with sea on 99% of your casts. The rigs are available at the SSF Rig Shop.
3 Hook Paternoster Clipped down:
To make a 3 hook paternoster all you need to do is add one more hook to the rig. Much like the 2 hook version you can choose weather to make one of the hook lengths (snoods) near to the bottom or if on rougher grounds you can have 3 hooks with the bottom snood ending near the weight. If you want it to be clipped down it is just a case of adding another section for snood to be attatched and using another cascade swivel (as displayed below). This is a really good rig when match fishing from the beach, especially in a winter competition where that extra bit of distance can make the difference. As I said previously, you dont have to make the rig clipped down as there is not always the need for distance or intricate rigs so making a standard 2 or 3 hook flapper can be easily done by replacing the cascade swivels with normal barrel swivels, removing the impact shield, and using crimps instead of the stopknots displayed in the picture. You can add beads or attractors depending upon the fish that you are targeting. You will need to add another cascade swivel section.
Wishbone Rigs: Firstly this is the rig that SEA ANGLER magazine call a plaice trace. This is because Plaice are a very visual hunter and are very inquisitive fish, often attracted to bright colours of flashing silver. Therefore this rig allows you to have a long flowing rig with bright beads and sequins on, you can also use small silver spoons for added attraction. Once the Plaice is attracted by the colours it will see the riggling bait (rag worms) and take the bait. These rigs are also effective for catcing flounders and many other species of fish due to the 2 baits being very close to each other and developing a good scent trail. Hook sizes are up to you, i would suggest size 1,2 or 4 but 4's may be too small for your bait and may also not unclip from the hook impact bait shield at the bottom of the rig. If you have tried to make this and are either having problems making or using it (tangles after reeling it back in) then try this alternative rig below which is still highly effective but just a little shorter in snood lenght so less chance of tangles. Float fishing rigs: This rig can be used to catch a variety of fish including Mackerel, Scad, Garfish, Pollack and Bass. Alterations to the floats set up and bait can result in the following fish being caught:- Bream, Shad, Mullet, Flounders and Wrasse. This rig is one of the easiest to make and is one of the most pleasurable ways to fish. Float fishing allows you to visually see the bites with the float often sinking under the water resulting in you striking into the fish. For those that catch Mackerel on feathers try this as you get a much better fight.
Step by step guide to making the rig:
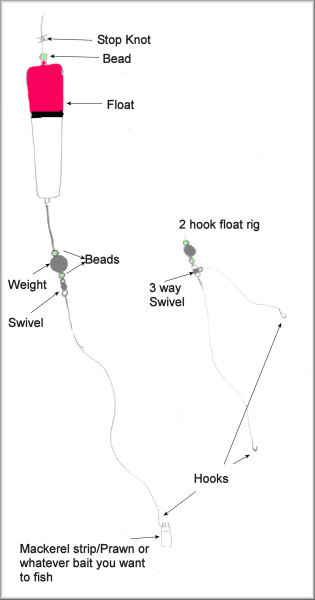
The Slider Rig: The benefit of this rig is that it allows you a level of flexibility and ways of targeting a range of species because is allows you to float fish and have a rig on the bottom for other fish species. In competitions you are often allowed a maximum or 3 hooks so you could have 2 hooks on the slider and one on the bottom or alternatively you could have 1 on the slider and 2 on the bttom. In some cases when there are plenty of surface fish, people use 3 hooks on the slider and just a weight to castout. I would advise never using more than 3 hooks in total as sliders are prone to tangles due to their long flowing nature, especially when you have a fish flapping about on it. How to use it: Basically you cast your rod out with your desired standard rig and make sure that you use a grip lead as this will hold bottom and stop your slider tangling with other people in the tide. Once the weight is fixed in the bottom then clip the slider onto your mainline by using he american snap swivel (in picture below). Then lift your rod and gently slide it down the line until it is in the water. it will then flow out towards your weight until it reaches the point where the line goes under the water. It will sit about and bob up and down in the water. Usually bites are shown when there is a Garfish jumping out of the water a few yards away from your float or it keeps making strong darting moves under the water.
Step by Step: 1. Select 3 1/2 ft of 50-80lb line and tie it to an american snap swivel. Slide a crimp up the line and squash it gently with pliers about 8 inches from the snap swivel. Follow this by a bead and then the float. 2. Then slide a bead, the ball weight and another bead up the line. Tie the loose end to a standard barrel swivel. 3. Tie about 8-12ft of 15lb line to the other end of the swivel. 4 feet from the swivel pinch the line and make knot (pictures below) 4. Ties size 4 hooks to each loose end and add very small sinker type weight to bottom hook length to keep it low in the water if fishing tidal areas. 5. Catch Fish!
CASTING HINTS AND ADVICE: For great advice on how to use different casting styles please visit the link below, it offers step by steps and video guides on techniques such as off the ground and pendulum casts. (As the site is external i take no responsibility of its content) Casting advice: http://breakawayusa.com/howto.htm or http://www.safetylighting.co.uk/kk2/casting_clinic_interface/Results/results_page.asp
IF YOU HAVE ANY QUESTIONS PLEASE EMAIL: CRAIGIDE@HOTMAIL.CO.UK OR LEAVE A MESSAGE VIA THE GUESTBOOK AND CLICK PRIVATE
Copyright © 2006 SussexSeaFishing |
||
|
|
||
Copyright © 2006 SussexSeaFishing
craigide@hotmail.co.uk
#sussexseafishin
| Site Map |